Wednesday, March 11, 2015

Velvet Pie


I asked my husband to pick a recipe out of The Pie Cookbook and get the ingredients from the store so I could make it for dessert. He picked two… Luckily, we wound up going to a party at a friends’ house, so I was able to bring along the pies to share with everyone. This is the first recipe of the two that I made.

Water-Beat Pastry

I had never heard of such a thing, so I decided to try it. I can’t say that I loved the process or the final product, but it wasn’t a terrible crust – I just don’t think I’d do it again.

¾ C shortening (NOT butter, margarine, or oil)
¼ C boiling water
1 tbsp milk
2 C flour
1 tsp salt

Those are the ingredient amounts if you’re making a two-crust pie. Since I was only making one: ½ C minus 1 tbsp shortening, 3 tbsp boiling water, 1 tsp milk, 1 ¼ C flour, ½ tsp salt

Put shortening in a bowl and add water and milk. Tilt bowl and beat ingredients rapidly with a fork until mixture is smooth and thick, like whipped cream, and holds soft peaks.


Mix flour and salt into shortening with fork until dough holds together and pulls away from sides of bowl. Roll out on board and use to assemble pie.


I also baked my pie shell for 10 minutes at 350oF because my recipe called for the pie shell to already be baked when I assembled the pie.

Velvet Pie

1 envelope unflavored gelatin
¼ C cold water
1 ½ C milk
3 eggs, separated
¼ C sugar
1/8 tsp salt
1 tsp vanilla extract
1 tsp cardamom
¼ C sugar
¼ tsp nutmeg
½ C heavy cream, whipped
Chocolate shavings (optional)

Add gelatin to water and set aside. Scald milk in a saucepan. Temper egg yolks and carefully add to milk. Mix in sugar and salt. Cook over medium heat, stirring, until custard becomes thick. Remove from heat. Add vanilla and gelatin. I added in some cardamom because it’s my new favorite spice – it gave the pie a very interesting spicy background flavor. Refrigerate, stirring occasionally, until mixture is very thick.


Remove custard from refrigerator and beat until smooth. In a separate bowl, beat egg whites until they form soft peaks. Carefully beat in sugar until stiff. Fold into custard and turn into baked pie shell.


Sprinkle top with nutmeg and refrigerate until set. Top with whipped cream and chocolate shavings if desired.


There are a lot of variations to this pie, but this is the standard recipe. The cookbook suggests these variations:
Eggnog Pie: Omit chocolate; substitute rum for vanilla; use 1 tsp nutmeg
Candy Velvet Pie: Omit chocolate and nutmeg; mix crushed peppermint candies into custard
Chocolate Flake Pie: Fold shaved unsweetened chocolate into custard
Coconut Bavarian Pie: Omit nutmeg and chocolate; Add ¼ tsp almond extract with vanilla; Fold ½ C shredded coconut into whipped cream
Coffee Velvet Pie: Add 2 tbsp instant coffee to egg whites before beating
Strawberry Velvet Pie: Fold 1 C sliced strawberries into cooled custard

Like I said, I just made the standard recipe, and it was a real crowd pleaser. I didn’t especially love the crust, but it wasn’t a big deal. The custard was smooth, creamy, and with just the right sweetness. I really liked adding the cardamom, but as you can see, this is such a simple pie recipe that you should feel free to experiment however you want. The velvet pie looked very pretty, too, with the creamy custard and the whipped cream on top. Overall, a very pleasant dessert.

Have a question or a request? Put it in the comments below and I’ll be sure to respond. Fröhe essen!

Monday, March 9, 2015

Fudge Cake Brownies


I like chocolate… Now that we’ve got that fact out of the way, moving on to dessert. I was looking for something quick and easy for dessert, and I looked back into The Dessert Lovers’ Handbook for a tasty little brownie recipe.

Fudge Cake Brownies

3 oz unsweetened chocolate
½ C butter
1 can sweetened condensed milk
2 eggs
1 C flour
½ tsp baking powder
¼ tsp salt
1 tsp vanilla
1 C chopped nuts

Blend chocolate and butter until melted in a large saucepot over medium heat.


Remove from heat; stir in sweetened condensed milk. Beat in eggs, one at a time. Mix dry ingredients together. Add dry ingredients slowly to chocolate mixture. Stir in vanilla and fold in nuts. Normally I hate nuts in brownies, but I decided to give it a go today.


Spread mixture in a well-greased 13x9in. pan. Bake at 350oF for 25 to 30 minutes. Cool and cut into squares.


I usually like brownies, but these were not quite what we were hoping for. If you like cake-style brownies, you’ll love these: they’re very fluffy and cakey. If, however, you are like us, and like your brownies on the fudgy side of things, you might be disappointed (I guess I should have been prepared for this by the name of the recipe, right?). The hubby didn’t even eat his share of them, and I wound up giving quite a few to the dog (don’t worry – she’s so big that it would take a LOT of chocolate to make her brain melt!). Still, brownies are brownies, so yum!


Have a question or a request? Put it in the comments below and I’ll be sure to respond. Fröhe essen!

Friday, March 6, 2015

Blitzkuchen


It’s a fact of life that everybody fights some times, right? Well, we had a fight, and I wanted to make it up to him. There are few better ways to a man’s heart than through his stomach, of course. And my husband is a particularly big fan of breakfast. Coffee cake to the rescue! This quick coffee cake recipe from The German & Viennese Cookbook hit the spot. Ah, domestic bliss!

Blitzkuchen/Quick Coffee Cake

1/3 C sugar
1 ½ tsp cinnamon
1/3 C chopped nuts
1 tbsp butter, melted
1 C flour
½ C sugar
1 ½ tsp baking powder
½ tsp salt
¼ C butter
1 egg, beaten
½ C milk

Mix together first four ingredients in the order listed and set aside – this is the topping mix.


Mix dry ingredients together. Cut in butter. Make a well in the center of the dry ingredients and add milk and egg. Stir only until moistened. Turn batter into a greased 8in. cake pan and spread evenly to edges.


Sprinkle topping over surface and gently pat down.


Bake at 375oF for about 20 minutes or until a cake tester comes out clean. Serve hot.


VARIATION: Apfelsinenkuchen/Orange Coffee Cake Substitute orange peel for cinnamon in topping mixture. Decrease milk to 1/3 C and add 3 tbsp orange juice.


I liked this cake because it looked so pretty – like the box coffee cake mixes we used to make on weekends when I was a kid. It was just about as simple, too. No fuss is the best way for breakfast, especially when breakfast is an apology. This was light and fluffy, with just enough cinnamon to wake up our taste buds.

Have a question or a request? Put it in the comments below and I’ll be sure to respond. Fröhe essen!

Wednesday, March 4, 2015

Kartoffelknödel

Being German, we love potatoes. No, really, I could eat potatoes with every meal. But to pair with our Pot Roast, I decided to try something new: dumplings. There are several different dumpling recipes in The German & Viennese Cookbook - some savory, some sweet. I had never made dumplings like this before, but I think they turned out all right.

Kartoffelknödel/Potato Dumplings

6 medium (about 2 lbs) potatoes
1 tbsp butter
1 slice bread
2 qts water
2 tsp salt
1 egg, beaten
1 tsp salt
1/4 tsp MSG
1/8 tsp white pepper
2/3 to 3/4 C flour
1/4 C cornstarch


Wash, cut, and boil potatoes until tender. I left the skins on my potatoes for a little extra fiber and less food waste. Drain potatoes and dry thoroughly. Mash or rice potatoes and set aside to cool completely.


Meanwhile, melt butter in a large skillet. Cut bread into cubes. I used some leftover sourdough bread I had laying around - I think it added a nice, authentic flavor. Put cubes of bread into skillet and toss until coated with butter and browned. Set aside to cool.

Bring water and salt to boiling in a saucepan.


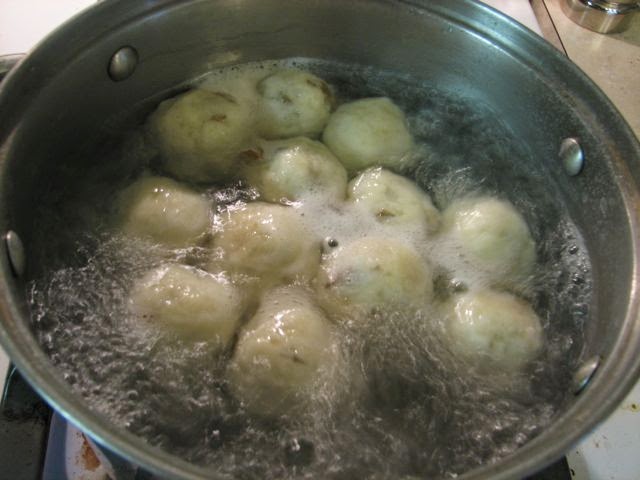
When potatoes are cool, whip in egg and seasonings until fluffy. Add cornstarch and enough flour to make a soft dough. Break off pieces of potato dough and shape into balls about 1-2in. in diameter. Poke one bread cube into the center of each ball.

Drop the dumplings into the boiling water. Cook only as many at a time as will sit uncrowded one layer deep. Cook about 5 minutes or until dumplings float to surface of water.

 
Carefully remove with a slotted spoon and drain. Serve with melted butter and sauerkraut, meat, or poultry.


I thought this was a really novel approach - making a dough out of mashed potatoes? It was a little bland, but that's easily fixed. Feel free to add a tad more salt and pepper to the dough, or any other spices you favor. When I removed the dumplings from the water, they seemed very loose to me and I was worried about them falling apart. But, after draining them and letting them sit on a plate for a few minutes, they firmed up. I was hoping that the bread cube/crouton in the center of each would provide a little crunch, but they seem to have gotten soft, so I'm not sure what their purpose is. These dumplings were really good at sopping up the delicious gravy from the Pot Roast, so this was definitely a success.


Have a question or a request? Put it in the comments below and I’ll be sure to respond. Fröhe essen!

Monday, March 2, 2015

Gedämpfter Rindsbraten

There are some things in life that can't be beat: foods that make the whole house smell amazing, foods that get better the more times you reheat the leftovers. Pot roast is one such meal. I decided that, since I've done so many of the recipes from The German & Viennese Cookbook, I will work from it more dedicatedly for a while and see if we can't finish one of these books? I did another marinated pot roast from this cookbook WAY back at the beginning of Essen Girl - Sauerbraten. That dish was refreshing with its mix of vinegar and wine in the marinade and sauce. For the Rindsbraten, a lot of red wine made for a thicker, richer sauce.

Gedämpfter Rindsbraten/Pot Roast with Wine

3-4 lb boneless beef pot roast
2 C red wine
2 medium onions, chopped
3 medium carrots, pared and sliced
3 stems celery, sliced
1 clove garlic, minced
1 bay leaf
1/4 tsp pepper

1/2 tsp MSG
4 sprigs parsley, chopped
1/4 C flour
2 tsp salt
1/2 tsp MSG
1/4 tsp pepper
3 tbsp butter
2 C red wine
1 C cold water
1/4 C flour
 

Wipe meat clean with a damp cloth. Wash and appropriately slice or chop vegetables. Put meat, vegetables, wine, and seasonings in a large bowl. Cover and put in the refrigerator to marinate for at least 12 hours. Turn meat occasionally during marinading process.


Drain the meat, reserving marinade (make sure to pick out the bay leaf!), and pat meat dry. Mix flour and seasonings together. Coat meat evenly with flour mixture. Heat butter in large pot. Brown meat slowly on all sides. Drain off excess fat. Add reserved marinade and extra wine. Cover and bring to boiling. Reduce heat and simmer for 3 hours or until meat is tender.


Mix water and flour together in a screw-top jar. With a whisk, incorporate enough of the flour mixture to thicken gravy as desired.


The meat was tender, the gravy was dark and super complex - everything a pot roast should be! We served this with some Brussels sprouts and Potato Dumplings for a very hearty dinner, plus wonderful leftovers for a few days. I would say that the 3 hours cooking time is definitely a minimum, especially if you have a well-marbled piece of beef. Although I don't own one, this is a perfect crock-pot recipe if you wanted to let the meat thoroughly melt while you were away at work. Another altogether satisfying meal!


Have a question or a request? Put it in the comments below and I’ll be sure to respond. Fröhe essen!

Friday, February 27, 2015

Cappelletti in Brodo


Woohoo! Now is the moment I’m sure you’ve all been waiting for: the completion of this week’s 3-part recipe! Earlier in the week we made Chicken Broth, then we made Pasta, and today we will put those two parts together to make a delicious, delicious soup! P.S. Gotta love the name of this soup, right?

Cappelletti in Brodo/Little Hat Soup

½ C Ricotta or cottage cheese
½ C finely chopped cooked chicken
2 tbsp grated Parmesan cheese
1 egg, beaten
1/8 tsp salt
Nutmeg
Pepper
2 qts Chicken Broth
½ recipe Pasta

Mix ingredients together in a bowl. The chopped chicken should come from what you strained out of the chicken broth. If you didn’t make the fancy chicken broth, any cooked chicken will do. I actually wound up using closer to ¾ C of chicken because the filling mixture looked very thin with only ½ C. I’m usually not a fan of Ricotta at all, but this didn’t turn out too bad. The nutmeg and pepper are added to taste – I would recommend a normal amount of pepper, and even though the nutmeg seems strange, add a fair amount. Set mixture aside.


Roll out pasta about 1/16 in. thick. Cut into 2 ½ in. rounds with a cookie cutter.


Place spoonful of filling mixture in the center of each round. Fold each round in half, covering the mound of filling. Be careful how much you add so it doesn’t squeeze out everywhere! Dampen edges of pasta with water and press together to seal. Bring two extreme ends together, dampen and seal. I didn’t do the final fold because it forced the filling out of the pocket. Maybe it’s because I’m not Italian, but I thought the half-moon pockets looked fine (although they don’t really look like hats). I also figured out that after you make the dumplings, let them sit for a few minutes so the dampened edges of the pasta have a chance to fuse together – this will help keep them from bursting during cooking. Between the filling and the pasta, this recipe made approximately 26 “hats”.


Bring broth to boiling and add pasta. Cook about 20 to 25 minutes or until pasta is tender. Serve with broth. Remember when the broth recipe said to strain out all the vegetables? Nowhere in this does it say to add them back in, and I thought that was a real crime. I mean, I love vegetables, and it seemed like a waste to use them in the broth but not eat them. On top of that, we’re trying to eat healthy, so the more vegetables the better!


This was fantastic. No, really. Like I said, I’m not really a fan of Ricotta or ravioli-type things, but I really liked this. My husband loved it! A few days after I originally made this, I pulled some of the containers of soup to the front of the refrigerator and he was like, “Wait, there’s more? I didn’t know there was more!” After which he immediately microwaved himself some Little Hat Soup.

Have a question or a request? Put it in the comments below and I’ll be sure to respond. Fröhe essen!

Wednesday, February 25, 2015

Pasta


The soup that I’m making is a three-parter; here is step 2! After making the Chicken Broth, the next step is to prepare the pasta dough for the little hats. This is a pretty standard, basic pasta recipe, but this was my very first time making fresh Italian-style pasta!

For the Little Hat Soup, I only needed to make a ½ recipe of this dough, but I have included the full recipe below.

Pasta/Basic Noodle Dough

4 C flour
½ tsp salt
4 eggs
6 tbsp cold water

Sift flour and salt together in a large bowl. Make a well in the center and add eggs, mixing slightly after each addition. Gradually add water until mixture forms a stiff dough. No kidding – it was really stiff! I was worried that I hadn’t added enough water, it was so tough and difficult to roll out, but I guess this is how it’s supposed to be. Turn onto a lightly floured surface and knead.


After that point, treat the dough as needed for each recipe. Remember, the third step in Little Hat Soup will appear on Friday!

Have a question or a request? Put it in the comments below and I’ll be sure to respond. Fröhe essen!

Monday, February 23, 2015

Brodo di Pollo


Since the weather is still cold, we’ve been having a very busy schedule, and we’re still trying to eat healthy, I decided to delve back into The Italian Cookbook for a good soup recipe we could eat for several days. When I found this recipe, I had no idea what I was in for! Even though it’s just one soup recipe, there are three separate recipes that we need to follow in order to create the deliciousness. Here’s the first component.

Brodo di Pollo/Chicken Broth

Normally, of course, if you’re strapped for time, you can just make chicken broth by dissolving chicken bouillon cubes or powder in hot water. But, if you want to make it the old-fashioned way (the way my Mom and Grandma do when they make home-made chicken soup), there’s quite a process involved. Confession time: I normally dislike home-made chicken soup because it feels terribly under-flavored to me (my family doesn’t use much salt or many spices). Needless to say, I was very nervous about this. However, it turned out for the best, so yay!

4-5 lb. stewing chicken
1 ¼ qts. hot water
2 tsp salt
1 tsp MSG
5 3-in. pieces celery with leaves
3 small carrots
2 medium-sized onions
1 large tomato

Clean, disjoint, and cut chicken into pieces. Rinse giblets in cold water. Set liver aside in refrigerator.


Clean and appropriately chop all vegetables. Although recipes seem never to say this (and my family doesn’t do it), I decided to cook my onions separately in some oil first to give them a bit more flavor – I think it greatly improved the depth of flavor in the broth. Place chicken, giblets, neck, vegetables, water, and seasonings in a large pot. Cover and bring to boiling. Remove foam from surface. Cover tightly and simmer 2 to 3 hours. During last 15 minutes, add liver to broth. Make sure chicken is cooked through and fork tender before turning off heat.

Remove chicken, giblets, and neck from broth, cool, remove skin, and chop finely.


Strain broth to remove vegetables. Remove fat that rises to surface.

Okay, so that’s the chicken broth, but there are two more steps before we actually wind up with soup. Stay tuned for the other steps on Wednesday and Friday this week so we can make Little Hat Soup!

Have a question or a request? Put it in the comments below and I’ll be sure to respond. Fröhe essen!

Friday, February 20, 2015

Carote con Olio e Aceto


Our final pickled vegetable for the week is carrots! I thought it was an odd choice, since carrots tend to be hard and not very porous, which I would think was a requirement for a pickled item, but we shall see.

Carote con Olio e Aceto/ Pickled Carrots

6 to 8 carrots
2 tbsp olive oil
1 clove garlic, quartered
1 hot pepper
½ tsp salt
White vinegar

After the overabundance of zucchini in the last recipe, I decided to play it safe and only used 3 or 4 carrots, but unfortunately that led to my jar not being completely full – sometimes you just can’t win. The addition of a hot pepper was very vague; I picked up a nice Hungarian pepper, but I decided to cook it a little with the carrots so it wouldn’t be at full blast in the jar.

Wash, pare, and cut carrots, then cook and drain. While the carrots are cooling, combine the remaining ingredients (except vinegar), mix in carrots and put in a 1 pint jar. Cover carrots with vinegar. Close jar and store in refrigerator at least 24 hours. Serve cold. Once again, shake, baby, shake!


Whew! Well, the moment I opened the jar, I could smell the hot peppers, which was nice. The carrots were basically still carrots, which is what I was expecting. I don’t know if pickled carrots are really a thing, but with the vinegary coating and the pickled peppers mixed in these were still pretty tasty.

Have a question or a request? Put it in the comments below and I’ll be sure to respond. Fröhe essen!

Wednesday, February 18, 2015

Zucchini con Olio e Aceto


The next pickled vegetable in our line-up is zucchini – I suppose they’re slightly more pickle-y because they are more like cucumbers. It’s too bad it’s so cold out, because I would love to be pickling zucchini from my own garden. Oh well, maybe next time.

Zucchini con Olio e Aceto/ Pickled Zucchini

3 to 4 zucchini
3 tbsp olive oil
2 tbsp olive oil
2 cloves garlic, quartered
½ tsp oregano
¼ tsp salt
1 bay leaf
White vinegar

Wash and trim ends from zucchini, then cut into ¼ in. slices. Heat olive oil in skillet and cook zucchini slowly until browned, then drain.


While zucchini cool, mix remaining ingredients (except vinegar) together, then mix in zucchini and put in 1 pint jar. FYI, I must have picked monster zucchini or something, because I had closer to 2 pints of zucchini, but who’s complaining?


Cover zucchini with white vinegar. Close jar and store in refrigerator at least 24 hours. Serve cold. Again, just like with the mushrooms, I recommend giving your zucchini pickles a few shakes to keep the olive oil from congealing.


The zucchini pickles were a little more refreshing for me than the mushrooms. They still have a good crunch to them, and the vinegar flavor is less prominent. There is a subtle flavor from the herbs in the background, but I think if I make these again I will increase the amount of Italian herbs I add to the pickling liquid.

Have a question or a request? Put it in the comments below and I’ll be sure to respond. Fröhe essen!

Monday, February 16, 2015

Funghi con Olio e Aceto


If you’re still on a diet kick (like us), after all of those Valentine’s Day sweets you might be craving some veggies. I know I was, so I returned to The Italian Cookbook for three refreshing pickled vegetable recipes from the Antipasto section.

Funghi con Olio e Aceto/Pickled Mushrooms

1 lbs mushrooms
White vinegar
Hot water
¼ C olive oil
2 tsp salt
2 tsp whole peppercorns
2 cloves garlic, quartered
1 tsp mace

The book says to clean the mushrooms but to leave them whole – the only mushrooms I could find in the grocery store today were sliced, so I’ll just deal with it. I also had no idea what mace was, and I didn’t have any living in my spice cabinet, so I went on an excursion to the spice aisle and discovered a very interesting red powder that is both sweet and spicy – good for savory dishes and some desserts!


Place mushrooms in saucepan and cover with equal amounts of vinegar and hot water. Bring mixture to boiling and cook for 5 minutes. Drain liquid from mushrooms. While mushrooms cool, mix together remaining ingredients, then combine with mushrooms and pack into 1 pint jar.


Cover mushrooms with white vinegar. Close jar and store in refrigerator for at least 2 days. Serve cold.


It seemed like a lot of vinegar to me, and the resulting pickles are a little too sour for my liking (remember, I’m German!), but not so tart that I won’t eat them. I’ve always liked preserving because of how the jars look, and this recipe doesn’t disappoint. However, I should warn you that giving your jar of mushrooms a shake twice a day will help to keep a layer of congealed olive oil from forming on the top of the mixture (I don’t think the olive oil was necessary at all, but hey, Italy). The mushrooms were slightly sweet/spicy because of the mace, which I liked a lot.

Have a question or a request? Put it in the comments below and I’ll be sure to respond. Fröhe essen!

Saturday, February 14, 2015

Special Offer!!!

Good morning! I know it's not a Monday/Wednesday/Friday, but I have something amazing to share with all of you! (or at least, those of you in a geographic area relatively close to mine)


With the opening of The Dessert Lovers' Handbook, I may have released a monster. As I said, I now own an astounding number of dessert recipes, and my tiny little family of 2 cannot possibly consume all of them on our own. What's the problem with too much dessert, you may ask. Of course, I love dessert, but I'm afraid that our under-consumption of desserts could adversely affect the consistency with which I post blog entries with the dis-proportionate number of desserts to entrees.


Basically, I'm asking for your help. Yes, YOU. This is your call to action (and dessert)! Since The Dessert Lovers' Handbook focuses on recipes including sweetened condensed milk as an ingredient, your challenge is simple. All you have to do is buy a can of sweetened condensed milk (brand doesn't matter) and give it to me. I will allow you to pick your recipe from the book, then I will make the dessert for you using YOUR can of sweetened condensed milk! This is truly a win-win, because YOU get free dessert and you get featured in Essen Girl, plus I get to keep cooking delicious things and writing about them! Yay!


Thank you SO much to JR and JL for this great idea - you girls get first pick of desserts!

Friday, February 13, 2015

Magic Chocolate French Fudge


I may or may not have mentioned that I have a sweet tooth… I probably did. In any case, it’s a fact, albeit often an inconvenient one. Still, dessert is the spice of life.

I know that I definitely have not yet mentioned another inconvenient fact: of the 55 or so antique cookbooks my mother-in-law gifted to me, a large group of them are devoted solely to desserts (cakes, pies, candies, chocolate, frozen treats, variety books), plus several of the others that primarily focus on entrees (like the ethnic cookbooks) ALSO feature entries for dessert recipes. Given this very sweet but very dismal outlook for our diet, I’m stymied as to continue on this blog adventure without this project deteriorating into just dessert after dessert. However, that is the sweet and silky cross I must bear.

In the meantime, it’s almost Valentine’s Day! If you’re looking for a sweet treat to make for a special someone, look no further. This recipe comes from a cookbook audaciously calling itself The Dessert Lovers' Handbook, and is devoted solely to recipes that include sweetened condensed milk as an ingredient.

Magic Chocolate French Fudge

I’m not really sure what makes this French… and I’m not really sure about the “magic,” either, except maybe that it refers to how easy this is (this fudge doesn’t require a candy thermometer).

3 C semi-sweet chocolate chips
1 can sweetened condensed milk
Pinch of salt
1 ½ tsp vanilla extract
½ C ground nuts OPTIONAL

Since I’m not a huge fan of nuts, especially in desserts, I opted out on this one (although I did add something special on top for my sweetie).


Melt chocolate, stirring occasionally. Most recipes recommend using a double boiler, but I’ve kind of given up on that. Melting works just find in a small saucepan, as long as you keep an eye on what’s happening, and it means you don’t have to worry about steam sneaking in and breaking your chocolate. Remove from heat. Add milk, salt, vanilla, and nuts if used. Stir only until smooth and incorporated. Turn into wax paper-lined 8-in. square pan. Spread fudge evenly and smooth surface. This is, of course, easier said than done. Unless you tape down your paper, it’s going to shift, and the fudge is so thick it will be difficult to spread. But, since one of the appeals of homemade candy is that it looks rustic, I wouldn’t sweat it if I were you. 


Refrigerate 2 hours or until firm. Turn candy out onto cutting board. Peel off paper. With a sharp knife, cut fudge into serving-sized pieces. Store in airtight container.


If you want to make mocha fudge, the recipe recommends omitting the vanilla and substituting in 1 ½ tbsp dry instant coffee. For my own personal variation, I sprinkled the top with crushed mint candies.

There it is. Nothing special, but there’s something pleasant about the smooth simplicity of chocolate fudge. With that ratio of chocolate to milk, this is definitely rich – I recommend one piece per serving – that way it lasts longer, and you won’t feel overwhelmed! As I said above, I have a lot of books with dessert recipes, so at some point in the future we will do more fudge, but I think this is enough for one sweet holiday.

Have a question or a request? Put it in the comments below and I’ll be sure to respond. Fröhe essen!

Wednesday, February 11, 2015

1000 VIEWS - THANK YOU!!!

Wow, Essen Girl viewers, thank you so much for all of the support and love! 7 months in, and we have hit 1,000 views! I am so grateful for everyone who has subscribed to this blog, read this blog casually, and even unintentionally stumbled upon it on the internet - you're all helping me grow and improve!

I promise, for the next 1,000 views, to give you even more delicious, fun, my-kitchen-tested antique recipes. Additionally, I would like to extend another contest offer to all of you. From now until the end of March, submissions will be open: simply comment on ANY Essen Girl post with a picture of the best thing you have ever cooked (one of the Essen Girl recipes is great, but anything will work). I will judge all of the pictures and pick 1 WINNER to join me in my kitchen to be a guest star for an Essen Girl post - get cooking!

Sesame Bars


From The 17th Annual Bake-Off comes another cookie/bar recipe. I like Asian-inspired dishes, so these cookie bars featuring sesame seeds caught my eye. Even though I knew that this was a heavily Americanized use of sesame seeds from the 1960s, I decided to try it anyway.

Sesame Bars

½ C butter
1 C sesame seeds
1 ¼ C flour
15 oz can sweetened condensed milk
½ C evaporated or regular milk
1 tsp vanilla

Melt butter in heavy skillet over medium heat. Add sesame seeds, stirring until golden brown, or about 5 minutes. Add flour; continue stirring until all is golden brown. Remove from heat. Add remaining ingredients, stirring quickly until incorporated. Return to medium heat, stirring constantly until mixture is glossy and leaves sides of pan, or about 3 minutes.


Pat into 8-in. pan. Notice nowhere in here does it say to grease the pan – I’m glad I used parchment paper, because these things are STICKY!


Cool, then refrigerate. Cut into bars, squares, or triangles.


As I cut these to serve, I noticed that they smelled a lot like peanut butter. The bars have a very interesting flavor, not necessarily sesame, but nice. They get very sticky and soft if you leave them at room temperature, so I recommend storing them in the fridge or freezer (although fresh out of the freezer they’re very hard and chewy). Not sure if I would make these again, but my guests for game night seemed to like them, so no big deal.

Have a question or a request? Put it in the comments below and I’ll be sure to respond. Fröhe essen!